 ClayTrace
Label the piece or tile
Give every test tile and pot an identifier you can read after firing: a number, a date or a short name. Use the same identifier in your notes, mark it on the tile with underglaze pencil or a stamp, and take a photo before the piece goes on the kiln shelf.
If a tile is a test for a particular pot, say which one. Three months later, a box of blue tiles with no notes is hard to use.
Write the layers in the order you put them on
Start with the bottom layer and work up. For each one, write the full product name and code from the jar, how you applied it (brushed, dipped, poured, sprayed), the number of coats or the dip time, and where it went. “Blue over white” is hard to repeat. “Two coats of white, then one of blue on the top third, dipped for three seconds” is not.
Write down what actually happened, too: a thin patch near the foot, an overlap at the rim, a dip that ran long. These details often explain the result.
| Field | What to write |
|---|---|
| Piece or tile | Identifier, date and a photo before firing |
| Clay body | Maker and clay name, plus the batch if you know it |
| Bisque | The bisque cone, if you know it |
| First layer | Product name and code, method, coats or dip time, area |
| Next layers | Each glaze in order, with the same details and any overlaps |
| Glaze firing | Cone or temperature, atmosphere, and hold if you know it |
| Result | Photos after firing, what you see, and what to change next time |
Keep the clay and firing in the same record
The same combination can look very different on another clay or in another firing. Mayco lists clay body, application and firing among the things that change a fired result, and AMACO suggests testing on the clay and texture you will use, fired the way your pots will be fired.
In a shared studio, ask what the studio records for each firing. If you only know the target cone, write it as a target and add the actual firing details if you get them later.
Finish the record after the glaze firing
Take one photo of the whole piece and one close-up of the area you were testing, in similar light each time so your results are easy to compare. Then note what you see: the overlap ran further than expected, the texture still shows through, the inside came out darker than the outside.
End with the one thing you would change next time, such as a thinner coat near the rim. That line is what you will look for at the next glazing session.
Read the log before you glaze again
Before you open a jar, look up the pieces you have already made with that glaze or clay and read their layer notes. Keep the failures as well. They save you from running the same test twice.
A good-looking test tells you about appearance. Whether a finished pot is safe for food depends on the glaze and the firing, so follow the manufacturer’s guidance on that.
Sources and further reading
Keep the layers with the piece in ClayTrace
On a piece’s Process tab, add glaze layers in order with coats, application method and the area each one covered, then add the firing and photos to the same piece. Open any glaze or clay in the Catalog to see every piece made with it. All of that is free. Studio Pro adds Library Compare for two pieces side by side, and Duplicate, which starts new pieces from one that worked with its clay, glaze layers and firing target copied in as the plan.
Free pottery journal · iPhone and Android · No account
See how ClayTrace works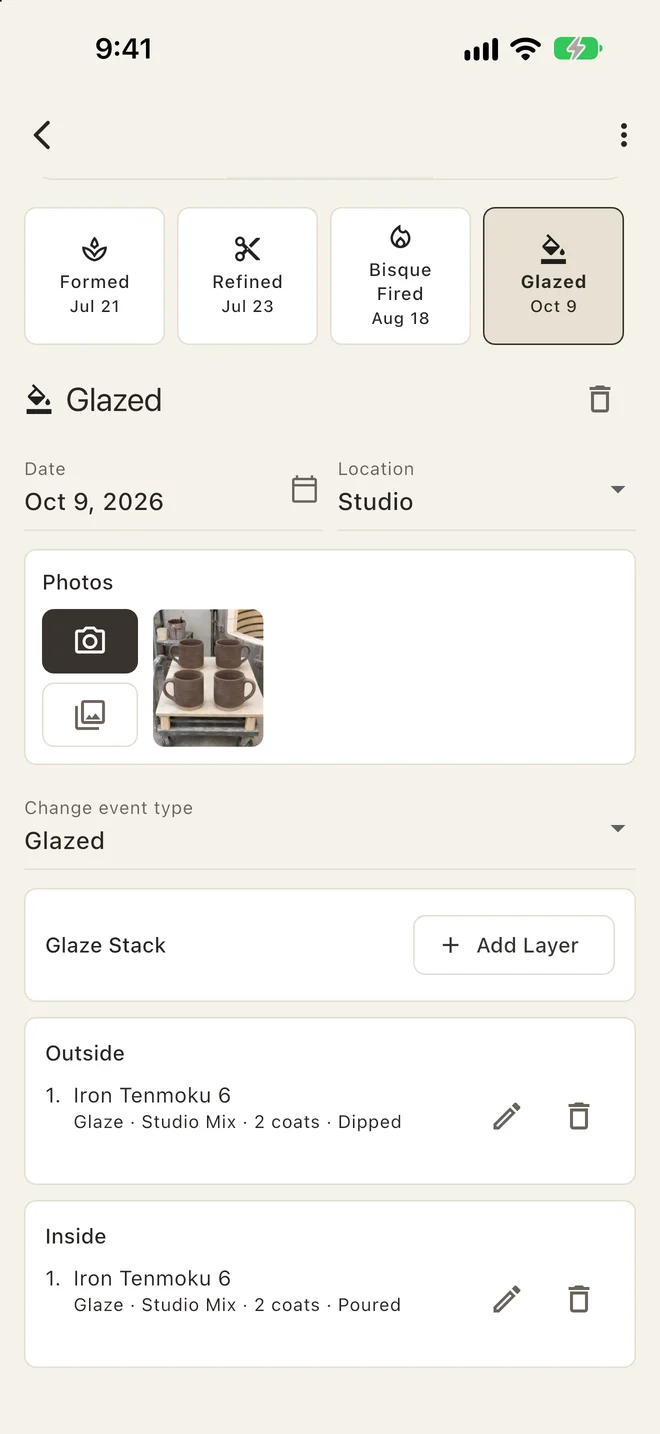
Questions
Is a notebook or spreadsheet good enough for a glaze log?
Yes, if it keeps the piece, its photos, the layers in order, the clay and the firing together, and you can find it at the glazing table. ClayTrace keeps all of that with each piece and lets you search by glaze or clay.
Can I copy a glaze combination from a photo I saw online?
Use the photo as a starting point and find out the clay, layer order, application and firing behind it. Then test it on a tile in your own kiln before glazing a finished piece.